
Turmeric (Curcuma longa), known as haldi in Hindi and pasupu in Telugu and Tamil, is more than just a spice. Revered for its medicinal properties, vibrant color, and culinary versatility, turmeric has become a must-have in kitchens worldwide. Traditionally grown in fields, turmeric can also thrive in terrace gardens, making it ideal for urban gardeners who want fresh, organic haldi at their doorstep.
In this guide, inspired by the practices of P Johnsi, we’ll explore how to grow, care for, and harvest organic turmeric on your terrace, along with tips to ensure healthy rhizomes, high yield, and minimal costs.
Why Grow Turmeric on a Terrace?

- Space Efficiency: Perfect for urban homes with limited ground space.
- Pesticide-Free: Control over growth means truly organic turmeric.
- Continuous Supply: With proper care, terrace gardens can produce turmeric annually.
- Health Benefits: Rich in curcumin, turmeric boosts immunity, improves digestion, and has anti-inflammatory properties.
- Cost-Effective: Once established, turmeric provides multiple harvests from minimal investment.
Step 1: Selecting Turmeric Rhizomes for Planting

The foundation of a successful terrace turmeric garden is healthy, disease-free rhizomes.
- Choose Fresh Rhizomes:
- Look for firm, plump, and unblemished turmeric pieces.
- Avoid shriveled, soft, or moldy rhizomes.
- Size Matters:
- Rhizomes around 2–3 inches in length with visible buds or “eyes” are ideal.
- Larger rhizomes generally produce more vigorous shoots and higher yields.
- Organic Rhizomes:
- Using organic turmeric ensures no chemical residues and better adaptation for terrace cultivation.
Pro Tip: Cut rhizomes into 2–3 inch pieces, ensuring each piece has at least one bud. Allow them to dry for a day to form a callus, reducing the risk of rotting.
Step 2: Choosing Containers for Terrace Gardening
Terrace gardening requires good drainage and space management:
- Container Size:
- Minimum depth: 12–15 inches for proper rhizome development.
- Wider containers allow multiple rhizomes in a single pot.
- Material:
- Clay pots, plastic tubs, or wooden boxes work well.
- Ensure drainage holes at the bottom to prevent waterlogging.
- Placement:
- Choose a sunny spot with at least 5–6 hours of sunlight daily.
- Turmeric thrives in warm conditions with indirect light during peak afternoon hours.
Pro Tip: Elevate containers slightly to improve drainage and avoid stagnant water, which can cause rhizome rot.
Step 3: Preparing the Soil Mix
Turmeric thrives in nutrient-rich, well-draining soil.
- Soil Composition:
- 2 parts garden soil or loamy soil
- 1 part well-rotted compost or organic manure
- 1 part sand or cocopeat for aeration and drainage
- pH Level:
- Ideal pH: 6–7 (slightly acidic to neutral)
- Enrichment:
- Mix in organic fertilizers like neem cake, bone meal, or vermicompost to encourage healthy rhizome development.
Pro Tip: Avoid heavy clay soil, which retains water and can cause rhizomes to rot.
Step 4: Planting Turmeric Rhizomes
- Planting Depth:
- Plant rhizome pieces horizontally, about 2 inches deep.
- Buds should face upward to facilitate sprouting.
- Spacing:
- Maintain 6–8 inches between rhizomes if planting multiple pieces in a single container.
- Watering:
- Water lightly after planting to settle the soil.
- Avoid waterlogging at this stage; soil should be moist but not soggy.
Pro Tip: Planting during the warm, post-monsoon season accelerates sprouting and vine growth.
Step 5: Watering and Moisture Management

Proper watering is crucial for healthy turmeric rhizomes:
- Early Growth Stage:
- Keep soil consistently moist to encourage bud sprouting.
- Mist leaves lightly if the terrace is windy or dry.
- Established Plants:
- Water 2–3 times a week depending on weather and container size.
- Reduce watering as leaves start yellowing near harvest time.
Pro Tip: Mulching with straw, dried leaves, or cocopeat helps retain moisture, regulate temperature, and suppress weeds.
Step 6: Fertilization for High Yield
- Organic Fertilizers:
- Use compost, vermicompost, or cow manure during planting.
- Supplement with organic liquid fertilizers like fish emulsion or seaweed extract during growth.
- Fertilizer Schedule:
- Apply nitrogen-rich fertilizers in early growth for leafy shoots.
- Switch to phosphorus and potassium-rich fertilizers when shoots are established for robust rhizome formation.
Pro Tip: Terrace-grown turmeric thrives on slow-release organic nutrients, which are cost-effective and safe for organic cultivation.
Step 7: Caring for Turmeric Plants
- Sunlight and Temperature:
- Turmeric prefers warm temperatures (25–30°C).
- Avoid prolonged exposure to harsh afternoon sun to prevent leaf scorching.
- Pruning and Maintenance:
- Remove yellow or damaged leaves to maintain plant health.
- Supports aren’t usually necessary for turmeric, as it grows upright naturally.
- Pest and Disease Management:
- Watch for aphids, mealybugs, or fungal infections.
- Organic sprays like neem oil or garlic extract are effective and safe.
Pro Tip: Regular observation and timely intervention ensure healthy rhizomes and higher yields.
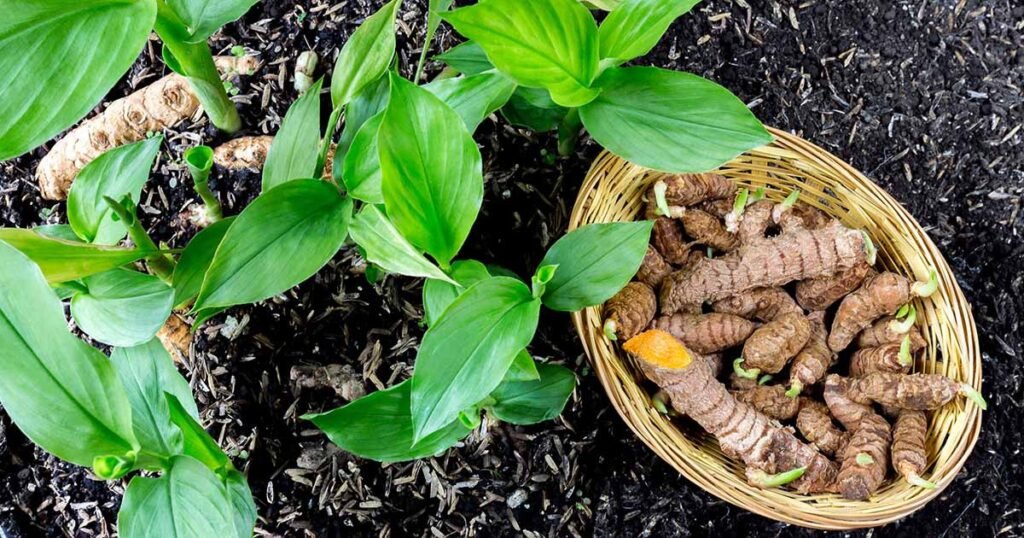
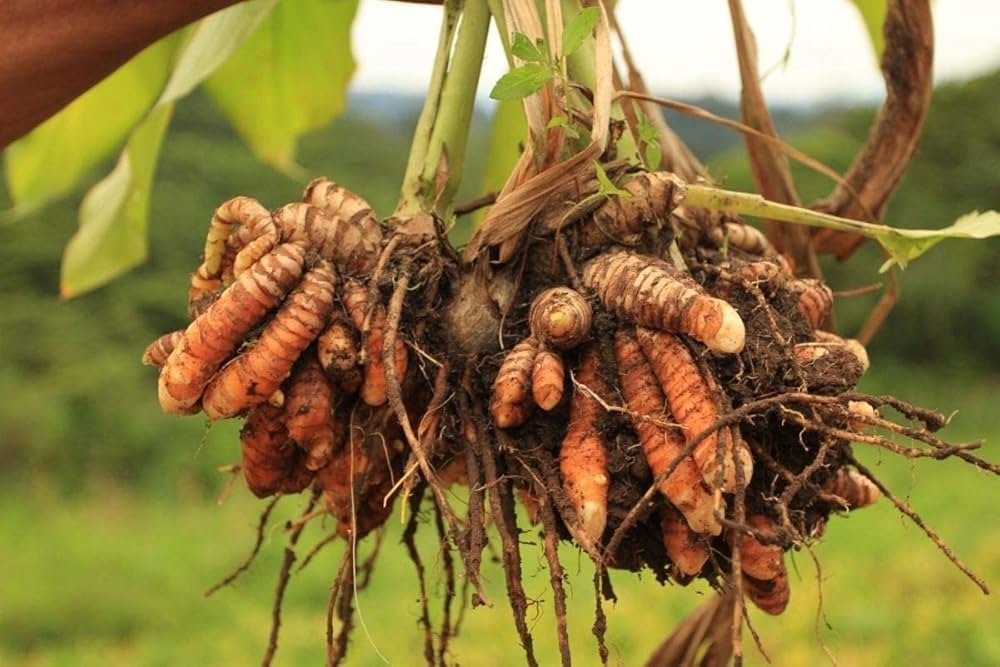
Step 8: Harvesting Turmeric Rhizomes
- Timing:
- Turmeric is ready for harvest 8–10 months after planting when leaves start turning yellow and dry.
- For young turmeric (less pungent and tender), harvest at 6–7 months.
- Harvesting Technique:
- Carefully dig around the base of the plant to avoid damaging rhizomes.
- Gently pull out the rhizomes and shake off excess soil.
- Post-Harvest Handling:
- Wash rhizomes thoroughly to remove soil.
- Cure in shade for 1–2 days before storage to prevent rot.
Pro Tip: A single plant can produce multiple rhizomes, and proper care allows for annual harvesting in terrace gardens.
Step 9: Low-Cost Tricks for Terrace Turmeric Gardening
- Use Kitchen Waste as Fertilizer:
- Compost vegetable scraps, banana peels, and coffee grounds to enrich soil naturally.
- Mulch for Moisture Retention:
- Straw, dry leaves, or grass clippings are cost-effective and eco-friendly.
- Container Recycling:
- Old plastic tubs, buckets, or wooden boxes can serve as turmeric planters.
- Rainwater Harvesting:
- Collect rainwater for irrigation, reducing water costs and promoting sustainability.
Pro Tip: Small, inexpensive measures can significantly increase yield while reducing gardening costs.
Step 10: Benefits of Growing Turmeric on a Terrace
- Fresh Supply: Enjoy haldi straight from your terrace garden.
- Pesticide-Free: Organic cultivation ensures safe, chemical-free turmeric.
- Health Benefits: Rich in antioxidants, curcumin, and anti-inflammatory compounds.
- Space-Efficient: Ideal for urban homes with limited space.
- Cost-Effective: Minimal investment and maximum output with terrace-friendly techniques.
Conclusion
Growing turmeric on your terrace is a practical, rewarding, and cost-effective way to enjoy fresh, organic haldi. By following these steps—selecting healthy rhizomes, using nutrient-rich soil, providing proper watering, fertilization, and timely harvesting—you can cultivate vibrant, healthy turmeric rhizomes right at home.
With simple, low-cost techniques inspired by P Johnsi’s terrace gardening methods, even urban gardeners can enjoy high-yield turmeric production. Start today and experience the joy of growing your own haldi, bringing freshness, flavor, and wellness straight from your terrace to your kitchen.
SEO & Social Media Hashtags:
#TerraceTurmeric #OrganicHaldi #HomeGardeningTips #DIYTurmericGarden #PasupuCultivation #UrbanFarming #OrganicVegetables #KitchenGarden #HighYieldTurmeric #DIYTerraceGarden